GDMC Part 1: MCEdit Basics

Generative Design in Minecraft (GDMC)

GDMC is a competition to generate settlements within a selection of a minecraft map. The project's website provides details on how the competition works and what is expected. However, the main point to get across right now is that they are judging based on adaptability, functionality, narrative, and aesthetics. Adaptability is about the generation technique working with the map rather than ignoring it. An example of ignoring the environment would be generating a wooden village where there are no trees. The functionality component is based on real world criteria such as access to food, defenses, etc. The narrative component is about how every area has a story to tell. An example is a castle with part of the tower knocked down. Lastly, aesthetics is about how it looks both in terms of believability and general appeal.

MCEdit

To generate settlements, the competition has gone the route of using MCEdit to allow competitors to view, generate, and modify minecraft maps. GDMC provides a wiki with easy to use instructions for installing and general set up. The wiki also provides an example cellular automata script for generating structures seen in figure one. As you can see, the output isn’t great, but it provides a nice starting point. It, also, shows how to work with the MCEdit filters which is how we can interact with the maps.


Figure 1: example cellular automata output from CASG_Example.py

Filters

A filter is how we are able to modify maps. To activate a filter, a user makes a selection on the map via a left click and dragging your mouse. From there, on the bottom of the screen, there is a potion looking icon that when pressed will open the filter menu. This provides a drop down menu of available filters. Each of these filters provides a set of options and the ability to perform their respective actions. When activated they will make modifications to the map given the users selection area. Each of the filters are Python 2.7 scripts located in the stock-filters directory.

Filter Basics

The wiki provides some helpful commentary in getting started with filters, but the script is a bit too complicated for a starting point. There are, however, two things that every filter has in common: the perform function and inputs tuple.

from pymclevel import alphaMaterials, MCSchematic, MCLevel, BoundingBox
from mcplatform import *

inputs = (
	("Replace Eight Corners", "label"),
	("Material", alphaMaterials.CoalBlock),
	("Creator: Colan Biemer", "label")
)

def perform(level, box, options):
	pass

When a filter is activated, the engine will call the perform function and pass the level data (this data structure will be explored further in the next post), the bounding box, and the set of options a user has defined. The bounding box defines the origin of the box the user created and the size. The options is a dictionary based on the inputs defined in the above script. Therefore, to access the materials you could use options[“Material”] to be able to see what the user set.

Box in all Eight Corners of Selection

Now that we understand the basics, we can start with a simple filter. The goal of this filter is to place a user defined material in all eight corners of the user’s selection. The end result can be seen in figure two. The first step here is to define the inputs for the user. In this case, the above inputs code is exactly what we need.


Figure 2: Example of placing blocks at all eight corners of user's selection space

Now we need to know how to draw a block and this can be found in the utility functions provided by NYU. I haven’t figured out the point of the function setBlockDataAt yet, but in the second post I intend to investigate more to figure it out. In the meantime, I wrote a simpler function because the data was always set to 0 in the examples I could find.

def draw_block(level, x, y, z, material):
	level.setBlockAt(x, y, z, material.ID)
	level.setBlockDataAt(x, y, z, 0)

With that complete, the only problem now is figuring out how to use the bounding box to find the eight corners. As noted above, the way the bounding box works is by providing an origin and size vector. All variations of adding these two together will provide eight values which are, coincidentally, the corners of the cube. The full filter can be seen below.

from pymclevel import alphaMaterials, MCSchematic, MCLevel, BoundingBox
from mcplatform import *

inputs = (
	("Replace Eight Corners", "label"),
	("Material", alphaMaterials.CoalBlock),
	("Creator: Colan Biemer", "label")
)

def draw_block(level, x, y, z, material):
	level.setBlockAt(x, y, z, material.ID)
	level.setBlockDataAt(x, y, z, 0)

def perform(level, box, options):
	material = options["Material"]

	draw_block(level, box.origin.x, box.origin.y, box.origin.z, material)
	draw_block(level, box.origin.x + box.size.x, box.origin.y, box.origin.z, material)
	draw_block(level, box.origin.x, box.origin.y + box.size.y, box.origin.z, material)
	draw_block(level, box.origin.x, box.origin.y, box.origin.z + box.size.z, material)
	draw_block(level, box.origin.x + box.size.x, box.origin.y + box.size.y, box.origin.z, material)
	draw_block(level, box.origin.x + box.size.x, box.origin.y, box.origin.z + box.size.z, material)
	draw_block(level, box.origin.x, box.origin.y + box.size.y, box.origin.z + box.size.z, material)
	draw_block(level, box.origin.x + box.size.x, box.origin.y + box.size.y, box.origin.z + box.size.z, material)

Fill Selection

In comparison to the eight boxes, this is a lot easier conceptually. All we want to do is fill the entire users selection with a material. The end result can be seen in figure three.


Figure 3: Two examples of filling in users selection with a different materials

The setup is exactly the same as last time where you can use the inputs to define the material. We can even use the draw_block function. At this point, it is probably best to create a script that contains common functions that could be useful in the future. From there, we need to create a function fill_box which takes in the level, origin, size, and material. To fill the box, it is as simple as three for loops that go through all possible x, y, and z values. It is important that you loop from the minimum to the maximum of these, else there is a chance you will not completely fill in the box.

from pymclevel import alphaMaterials, MCSchematic, MCLevel, BoundingBox
from mcplatform import *

inputs = (
	("Replace All", "label"),
	("Material", alphaMaterials.CoalBlock),
	("Creator: Colan Biemer", "label")
)

def draw_block(level, x, y, z, material):
	level.setBlockAt(x, y, z, material.ID)
	level.setBlockDataAt(x, y, z, 0)

def fill_box(level, origin, size, material):
	final_x = origin.x + size.x
	final_y = origin.y + size.y
	final_z = origin.z + size.z

	for x in range(min(origin.x, final_x), max(origin.x, final_x)):
		for y in range(min(origin.y, final_y), max(origin.y, final_y)):
			for z in range(min(origin.z, final_z), max(origin.z, final_z)):
				draw_block(level, x, y, z, material)

def perform(level, box, options):
	fill_box(level, box.origin, box.size, options["Material"])

Box Outline

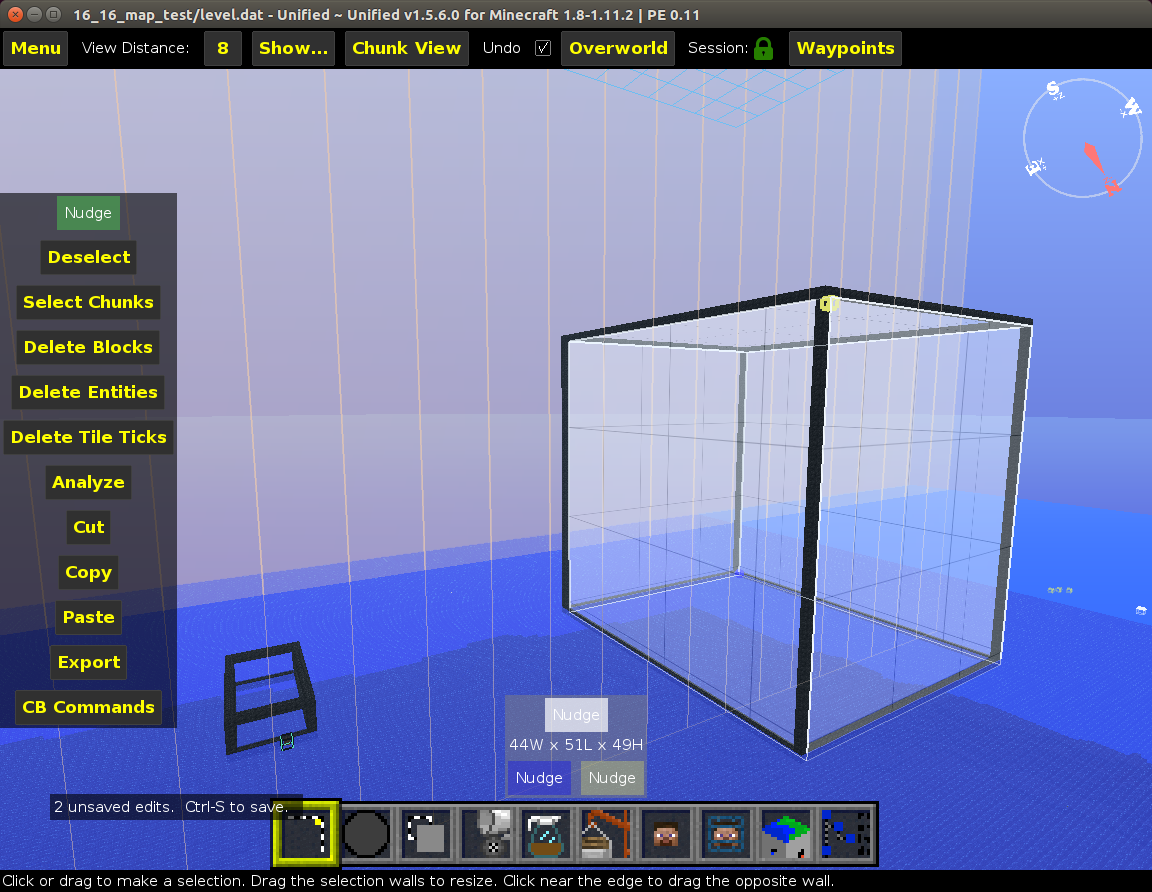
In this case we want to take the user’s selection and draw blocks along the edges, an example can be seen in figure four. The complexity for this problem is creating a function that will properly draw lines. Specifically, it is necessary to make sure it can draw diagonal lines for the sake of completeness.


Figure 4: Example of drawing the edges for a user's selection

The main difficulty in this problem is making sure every direction a line can move is accounted for. The list is quite long but mainly requires some attentiveness on our our part when defining all the possibilities.

directions = [(1,0,0),(-1,0,0),(0,1,0),(0,-1,0),(0,0,1),(0,0,-1),\
              (1,1,0),(-1,1,0),(1,-1,0),(-1,-1,0),(0,1,1),(0,-1,1),\
              (0,1,-1),(0,-1,-1),(1,0,1),(-1,0,1),(1,0,-1),(-1,0,-1),\
              (1,1,1),(-1,1,1),(1,-1,1),(1,1,-1),(-1,-1,1),(-1,1,-1),\
              (1,-1,-1),(-1,-1,-1)]

We now have the task of using the directions array to draw the line along the shortest path from the starting point to the end point. I first wrote this with a recursive method, where it would find the point closest, with the manhattan distance, and then draw a block. It would recursively call itself again, drawing a block at the next closest point, until it had reached the end point. Please note that I did not put in object avoidance into this method as it was beyond the scope of the problem. With the recursive method complete, it became clear a while loop would be just as clear with minimal code changes and be more performant since tail recursion is not supported by Python.

Once drawing a line was completed, the last step was to use the vertices I defined in the section dedicated to drawing materials in all eight corners to draw the edges as well. The code for the filter is below.

from pymclevel import alphaMaterials, MCSchematic, MCLevel, BoundingBox
from pymclevel.box import Vector
from mcplatform import *

inputs = (
	("Replace All", "label"),
	("Material", alphaMaterials.CoalBlock),
	("Creator: Colan Biemer", "label")
)

def vector_equals(v1, v2):
	return v1.x == v2.x and v1.y == v2.y and v1.z == v2.z

def manhattan_distance(start, end):
	return abs(end.x - start.x) + abs(end.y - start.y) + abs(end.z - start.z)

def draw_block(level, x, y, z, material):
	level.setBlockAt(x, y, z, material.ID)
	level.setBlockDataAt(x, y, z, 0)

def draw_block(level, point, material):
	level.setBlockAt(point.x, point.y, point.z, material.ID)
	level.setBlockDataAt(point.x, point.y, point.z, 0)

def fill_box(level, origin, size, material):
	final_x = origin.x + size.x
	final_y = origin.y + size.y
	final_z = origin.z + size.z

	for x in range(min(origin.x, final_x), max(origin.x, final_x)):
		for y in range(min(origin.y, final_y), max(origin.y, final_y)):
			for z in range(min(origin.z, final_z), max(origin.z, final_z)):
				draw_block(level, x, y, z, material)

def draw_line(level, start, end, material):
	directions = [(1,0,0),(-1,0,0),(0,1,0),(0,-1,0),(0,0,1),(0,0,-1),\
	              (1,1,0),(-1,1,0),(1,-1,0),(-1,-1,0),(0,1,1),(0,-1,1),\
	              (0,1,-1),(0,-1,-1),(1,0,1),(-1,0,1),(1,0,-1),(-1,0,-1),\
	              (1,1,1),(-1,1,1),(1,-1,1),(1,1,-1),(-1,-1,1),(-1,1,-1),\
	              (1,-1,-1),(-1,-1,-1)]
	draw_block(level, start, material)

	while not vector_equals(start, end):
		new_s = start + directions[0]
		dist  = manhattan_distance(start, end)

		for i in range(1, len(directions)):
			s = start + directions[i]
			d = manhattan_distance(s, end)

			if d < dist:
				new_s = s
				dist  = d

		start = new_s
		draw_block(level, start, material)

def draw_box_outline(level, box, material):
	point_1 = box.origin
	point_2 = Vector(box.origin.x + box.size.x, box.origin.y, box.origin.z)
	point_3 = Vector(box.origin.x, box.origin.y + box.size.y, box.origin.z)
	point_4 = Vector(box.origin.x, box.origin.y, box.origin.z + box.size.z)
	point_5 = Vector(box.origin.x + box.size.x, box.origin.y + box.size.y, box.origin.z)
	point_6 = Vector(box.origin.x + box.size.x, box.origin.y, box.origin.z + box.size.z)
	point_7 = Vector(box.origin.x, box.origin.y + box.size.y, box.origin.z + box.size.z,)
	point_8 = Vector(box.origin.x + box.size.x, box.origin.y + box.size.y, box.origin.z + box.size.z)

	draw_line(level, point_1, point_2, material)
	draw_line(level, point_1, point_3, material)
	draw_line(level, point_1, point_4, material)
	draw_line(level, point_2, point_6, material)
	draw_line(level, point_4, point_6, material)
	draw_line(level, point_3, point_7, material)
	draw_line(level, point_4, point_7, material)
	draw_line(level, point_7, point_8, material)
	draw_line(level, point_6, point_8, material)
	draw_line(level, point_8, point_5, material) 
	draw_line(level, point_5, point_2, material)
	draw_line(level, point_5, point_3, material)

def perform(level, box, options):
	draw_box_outline(level, box, options["Material"])

Next Time

In the next post, I intend to start learning how the level data structure works and how it can be explored. The first step will probably be something simple like finding how many times a material appears in the user’s selection. From there, I’ll look to replicate something similar to what Christoph Salge did with replacing the top layer with a new material. I'm also planning for a small digression into Conway's Game of Life just for fun.

Citation